Imaging sensors: dust, blemishes, dead and hot pixels

posted: 05 October 2022

Introduction

Imaging sensors need to be kept clean to ensure images free of artefacts. Dust is the most common cause of such problems. Fortunately, dust can be removed from a sensor with the right tools.

However, it is still important to be able to identify any marks on the sensor as dust, stains or dead pixels.

You first need to ensure that dirt lies on the sensor surface and not on the lens/telescope you use. To do that bring the dirt into focus and rotate the lens telescope independently of the camera.

If the dirt does not move on the screen, then the dirt is on the sensor. If the dirt moves, then the dirt is on the lens you use in which case you would need to clean the lens.
Imaging sensors: dust, blemishes, dead and hot pixels.

Dust particles

The image on the right shows a dust particle that has landed on the camera sensor.

When focused dust particles will look blurred once the image has been magnified. Expect the centre of the dust particle to remain very dark, i.e., black.
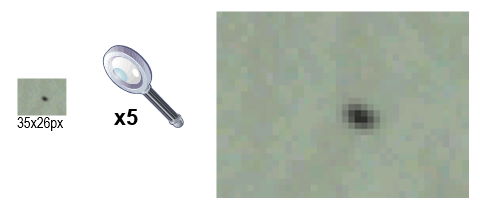
Dust particle.

Liquid stains

The image on the right shows a liquid (i.e. water) that has landed on the camera sensor.

When focused the affected area will show a level of semi-transparency. Expect a similar effect from other semi-transparent substances including water, glue or varnish.
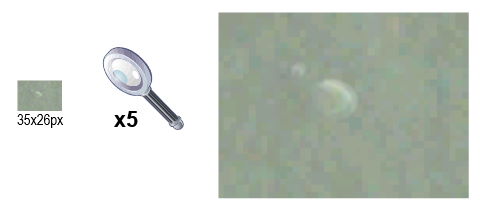
Liquid stain.

Sensor stains

A permanent stain would appear like a dust particle or liquid stain but could be impossible to remove by cleaning the sensor with a suitable cleaning agent, cloth used to clean photographic lenses and sensors or by displacing it with compressed air.

In general, a permanent stain could be paint, varnish or glue that has landed on the sensor and has dried up.

Imaging sensors with permanent stains, are spotted by the camera manufacturer during the quality assurance process and do not reach the market. The cameras and sensors are checked at the point of manufacture and assembly at the factory, and often once more prior to despatch to customers.

Dead pixels

The image on the right shows a 3x2 cluster of dead pixels on the sensor.

Dead pixels appear as clearly defined rectangular shapes with straight sides as this magnified image shows.
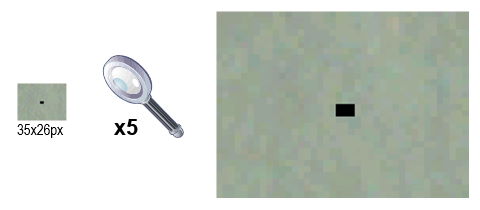
Dead pixels.

Hot pixels

The number of hot pixels will increase as sensor temperatures rise during longer exposures. The single most effective way to combat this type of noise is by cooling the sensor. The ideal way to dramatically reduce the number of hot pixels is by cooling the camera sensor with a powerful Peltier/heatsink arrangement and a large fan to rapidly dissipate the heat from the heatsink. Peltier, heatsink and fan are all required for efficient cooling.

Hot pixels appear as clearly defined shapes with straight sides as this magnified image below show. Hot pixels vary in ‘colour’ and brightness depending on the temperature, type and quality of the sensor.

Hot pixels.


Cooled cameras will show a significantly lower number of hot pixels depending on the efficiency of the cooling subsystem.

Dust and astronomy

Sensors are electrical charged devices and as such they will always attract dust. It is therefore important to know how to deal with dust on an ongoing basis and most important how to clean the sensor. In general, the closer a particle of any type is to the sensor the greater the problem will appear to be.

Dust particles on the sensor, typically around 1/10mm in size, will appear as blobs of fair size on an image. On the other hand, the same dust particle on the objective lens of a telescope will have a minimal effect and may be very difficult or even impossible to notice.

Sensor cleaning

There are many ways and tools that can be used to clean a sensor including:

  • Compressed air, some solutions from Green Clean incorporate a vacuum cleaner.
  • The Arctic Butterfly battery operated sensor cleaner.
  • Dust-Aid adhesive-based sensor cleaner.
  • Cleaning cloth used for cleaning photographic lenses and/or sensors.
  • Lens Pen.
  • Sensor-Clean for removing non-permanent stains.

Compressed air works reasonably well for dislodging dust particles but probably the easiest way is to use the Dust-Aid adhesive pads or the Artic Butterfly products.

Cleaning materials.


Related topics:  how-to guide, astrophotography, article

Author:  Opticstar

Links
News archive
Posts
2024 (7)
April (1)
Apparent magnitude and its relevance to imaging
March (2)
April deep sky watch
Meade LX65 8" ACF review
February (2)
March deep sky watch
Imaging with a telescope
January (2)
February deep sky watch
Choosing your second telescope
2023 (24)
December (2)
January deep sky watch
Meade LX65 8" ACF SkyNews review
November (2)
December deep sky watch
Aligning your computerised Alt-Az telescope
October (2)
November deep sky watch
Planetary prime focus astrophotography
September (2)
October deep sky watch
Deep sky prime focus astrophotography
August (2)
September deep sky watch
An introduction to the Meade LX65 ACF telescopes
July (2)
August deep sky watch
Wilderness Spotting Scopes
June (2)
July deep sky watch
Visual observation through an astronomical telescope
May (2)
June deep sky watch
How to Setup & Use Your 50mm Guide Scope
April (2)
May deep sky watch
How to polar align your equatorial telescope
March (2)
April deep sky watch
Back and better than ever – Meade Deep Sky Imager (DSI) IV
February (2)
March deep sky watch
How to setup and align your Meade LX65 telescope
January (2)
February deep sky watch
AudioStar explained
2022 (24)
December (2)
January deep sky watch
What you did not know you needed - Meade LPI-G
November (2)
December deep sky watch
Meade LX65 redefines ease of use
October (2)
November deep sky watch
Imaging sensors: dust, blemishes, dead and hot pixels
September (2)
October deep sky watch
Powering your telescope
August (2)
September deep sky watch
Apparent magnitude and its relevance to imaging
July (2)
August deep sky watch
Bring wildlife up close and personal
June (2)
July deep sky watch
Imaging with a video camera
May (2)
June deep sky watch
Sensor size and field of view
April (2)
May deep sky watch
How to setup the Meade LightBridge Plus
March (2)
April deep sky watch
Image projection explained
February (2)
March deep sky watch
How to use Meade SkyCapture part 2
January (2)
February deep sky watch
How to use Meade SkyCapture part 1
2021 (16)
December (2)
January deep sky watch
Aligning your computerised Alt-Az telescope
November (2)
December deep sky watch
Meade Instruments - Tijuana factory
October (2)
November deep sky watch
Imaging with a telescope
September (2)
October deep sky watch
An introduction to the Meade LX65 ACF telescopes
August (2)
September deep sky watch
Observing the Sun
July (1)
Understanding the Coronado PST & SolarMax III solar telescopes
June (2)
Solar and night-time astronomy
Reorganisation of Meade Instruments
May (2)
Wilderness Spotting Scopes
Online shopping
February (1)
Product catalogue 2021
2020 (13)
December (1)
Visual observation through an astronomical telescope
November (1)
How to Setup & Use Your 50mm Guide Scope
October (1)
How to polar align your equatorial telescope
September (1)
Choosing your second telescope
August (1)
Exclusive Meade dealer
July (1)
Stock update
June (1)
Coronado SolarMax III 70/90 solar telescope: A primer
May (2)
Remote control for Meade telescopes
Planetary prime focus astrophotography
April (2)
Deep sky prime focus astrophotography
Choosing your first telescope
March (1)
How to setup and align your Meade LX65 telescope
January (1)
Meade’s 10-inch LX600-ACF Telescope - Sky & Telescope magazine review
2019 (9)
November (1)
Meade’s 115-millimeter ED Triplet - Sky & Telescope magazine review
September (1)
Meade LX65 8-inch ACF - BBC Sky at Night magazine review
July (2)
Back and better than ever – Meade Deep Sky Imager (DSI) IV
What you did not know you needed - Meade LPI-G
June (1)
Meade LX65 8" ACF SkyNews review
May (1)
Meade LX65 8" ACF review
April (1)
Product catalogue 2019
February (1)
Meade LX850 astro-imaging system
January (1)
Meade and Coronado eyepieces
2018 (4)
December (1)
Meade LX65 and LX85 released
September (1)
Meade LX65 redefines ease of use
June (1)
Coronado SolarMax III 90 announced
March (1)
How to setup and align your ETX Observer
2017 (10)
December (1)
New law against laser pointer use
October (1)
SolarMax III and Series 6000 APO Quad
August (1)
Coronado SolarMax II
July (1)
Meade LPI-G camera review
June (1)
Coronado Personal Solar Telescope (PST)
May (2)
Meade ETX90 Observer review
Meade ETX Observer review
February (1)
Meade telescope offers at AstroFest 2017
January (2)
Meade at the European AstroFest 2017
Meade LX850 advert in print
2016 (25)
December (2)
Meade ETX90 Observer review
Choosing a small computerised telescope
November (1)
Photography with the Meade ETX90
October (4)
Meade LX90 advert in print
Meade ETX90 Observer review
The International Astronomy Show 2016
Meade STELLA Wi-Fi adapter
September (4)
Meade's successful Photokina 2016
Meade at Photokina 2016
Meade LX600 StarLock
Wilderness spotting scope review
August (2)
ETX Observer advert in print
LightBridge Mini review
July (2)
All-new Meade ETX Observer
North West Astronomy Festival 2016
June (8)
Meade LightBridge Mini 130 review
Meade at NEAF 2016
Tim Peake returns to Earth
Tring Astronomy Centre
AutoStar and AudioStar explained
Legislation to combat light pollution
Promotion extended through summer
Coronado advert in print
May (2)
European Extremely Large Telescope
Meade UK news