Introduction
This article identifies the parts of a complete imaging system for astronomy, discusses the relationships of the parts and presents a range of relevant astronomical equipment and software. The article also outlines the process of capturing and processing an image captured with a telescope and digital camera.
The article considers a range of computerised telescopes and digital cameras for imaging and, while it only refers to certain Meade telescopes, accessories, cameras and software in its examples, the underlying concepts remain mostly the same for different equipment.
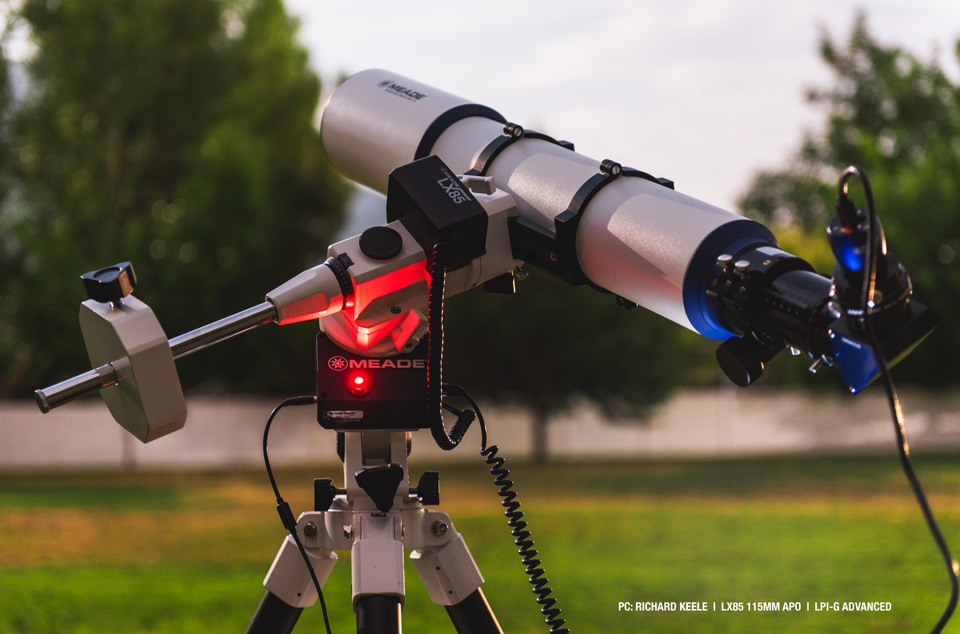
Imaging with a telescope.
System components
A typical imaging system for astronomy would consist of a number of components as outlined in the table below. Some components are necessary to simply capture, store and view an image. Complementary components vary in importance depending mainly on the type of target and camera used and also the amateur astronomer’s expectations. The importance of the complementary components cannot be stressed enough and their use can make the difference between a basic image and one of high quality.
| Component |
Main Function |
Requirement |
| Imaging Telescope |
Acts as a photographic lens for the imaging camera. |
necessary
|
| Telescope Mount |
To accurately track a Celestial target over long periods. |
necessary
|
| Guide-scope |
To precisely guide the mount during longer exposures. |
complementary |
| Computerised Mount |
To mount the scope and guide scope if one is used. |
necessary
|
| Imaging Camera |
To capture images of the Moon, planets, galaxies, nebulae etc. |
necessary
|
| Auto-guide Camera |
To precisely track a selected star via the guide scope. |
complementary |
| Filter Wheel |
For LRGB and narrow-band imaging via a variety of filters. |
complementary |
| Digital Focuser |
To accurately focus any of the cameras. |
complementary |
| Personal Computer |
To run various software. |
necessary
|
| Control Software |
To remotely control the mount, cameras etc. |
complementary |
| Image Processing Software |
To process and enhance captured images. |
necessary
|
| The amateur astronomer |
Put in the effort and allocate the time required to the task. |
necessary
|
The diagram below shows a complete imaging setup in terms of a Meade LX600 ACF telescope consisting of a number of components as follows:
- 1. LX600 ACF equatorially mounted telescope on X-Wedge, for automatically locating and tracking Celestial objects and to facilitate extended exposures as required.
- 2. LX600 F/8 ACF optical tube assembly (OTA) for imaging.
- 3. StarLock, for easy telescope alignment and advanced auto-guiding, computer (PC) not required.
- 4. AutoStar II handset, for controlling and issuing GOTO commands to the telescope.
- 5. DSLR camera used to image with.
Since, the LX600 ACF telescope, StarLock and the attached DSLR camera function independently of a PC, a PC would be complimentary and not required in this example.
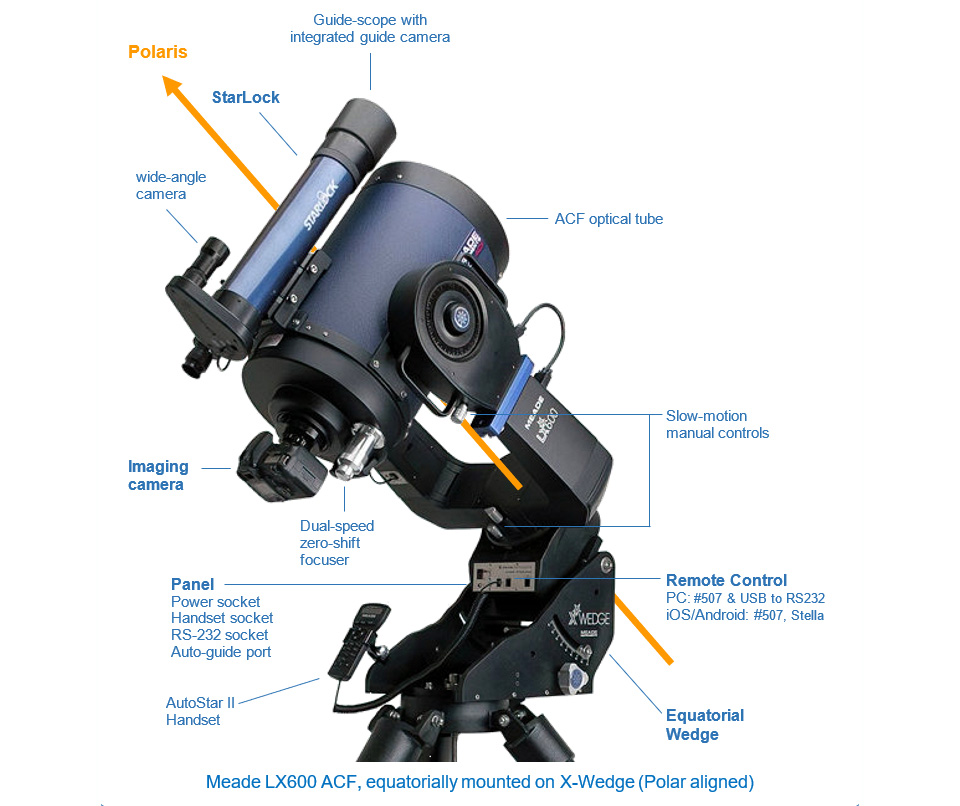
Imaging with a Meade LX600.
However, most other setups would require a PC with the appropriate software to control a different auto-guiding solution typically consisting of a small 50mm-80mm guide-scope and auto-guide camera (e.g., the Meade Series 6000 Guide-scope and LPI-G auto-guide camera) in place of StarLock.
Equally, for imaging purposes the DSLR camera could be replaced by a dedicated cooled astronomy camera like the Meade’s DSI-IV cooled deep sky camera that requires a PC to control and operate.
Tracking & auto-guiding
Computerised mounts have the ability to automatically locate, slew and then track a Celestial object for long periods. However, for deep sky imaging purposes where tracking accuracy is paramount, exposures would typically be limited to a few minutes for an equatorially mounted telescope depending on the mount, markedly less for an Alt-azimuth mounted telescope. To significantly extend exposure times, you would need to be able to auto-guide. For that you would require the following:
- 1. Computerised equatorially mounted telescope with an ST-4 type port.
- 2. Auto-guide camera with ST-4 type port.
- 3. Guide-scope.
- 4. A personal computer with auto-guiding software.
PC independent solutions like Meade’s StarLock, integrate a guide scope, two cameras and on-board electronics to provide advanced auto-guiding capabilities beyond those of a traditional auto-guiding solution and without the need for a PC.
When auto-guiding, the guide-scope will lock on a target star and ensure that the selected star remains at the exact same point on the imaging frame by sending signals to the mount’s motors to speed up or slow down so as to keep the guide-star motionless in the frame during very long exposures.
Mountings and their relationship to imaging
The mount is the one single most important part of the imaging system. A state-of-the-art optical tube and camera will never compensate for an underperforming mount. Typically, images will suffer from loss of contrast and star trails caused by vibration in the mount and inaccurate tracking that will ultimately result to poor quality images.
It is important not to overload the mount and always load it to around 5%-10% below the maximum recommended capacity when imaging. When using bulky scopes like Newtonian reflectors this figure should be closer to 15% since even small gusts of wind could shake the optical tube. This would not be an issue if the telescope was inside an observatory or atmospheric conditions were favourable.
A computerised mount is required for imaging deep sky objects like galaxies, nebulae and star clusters that require several long exposures that will be later stacked and processed so as to create a single image of high quality. The higher the quality of the mount, the higher the tracking accuracy will be. This will allow longer exposures that will in return result to captured images of higher brightness, contrast and detail.
Equatorial mounted telescopes for deep sky imaging
Ultimately, a computerised, German equatorial mount like the Meade LX85 and LX850 is required for deep sky imaging. Alt-azimuth mounted telescopes are not suited for deep sky imaging mainly due to field rotation issues and thus will not benefit from auto-guiding; tracking accuracy alone does not play a part in addressing field rotation. Alt-azimuth mounted telescopes are still very well suited for planetary, Lunar and some introductory deep sky imaging without the need for a wedge.
Equatorially mounted alt-azimuth telescopes for deep sky imaging
However, Alt-azimuth telescopes can be equatorially mounted with the addition of an equatorial wedge. This eliminates field rotation and the telescope would now fully benefit from auto-guiding. Meade supplies equatorial wedges for the LX90 ACF, LX200 ACF and LX600 ACF Series. The Meade ETX-90 and ETX-125 Observer come with a built-in wedge in terms of a tilt-plate that acts as a wedge.
Most modern mounts are computerised and include GOTO type handsets that enable the mount to locate a target selected from a database of thousands of Celestial objects and automatically track it. It is important that the mount comes with an auto-guide (ST-4 type) port or has the option to add one as in the case of the LX90 ACF Series. A computerised, equatorially mounted telescope with an ST-4 auto-guide port is required to auto-guide the mount and help to dramatically extend exposure times with the addition of a guide-scope and auto-guide camera.
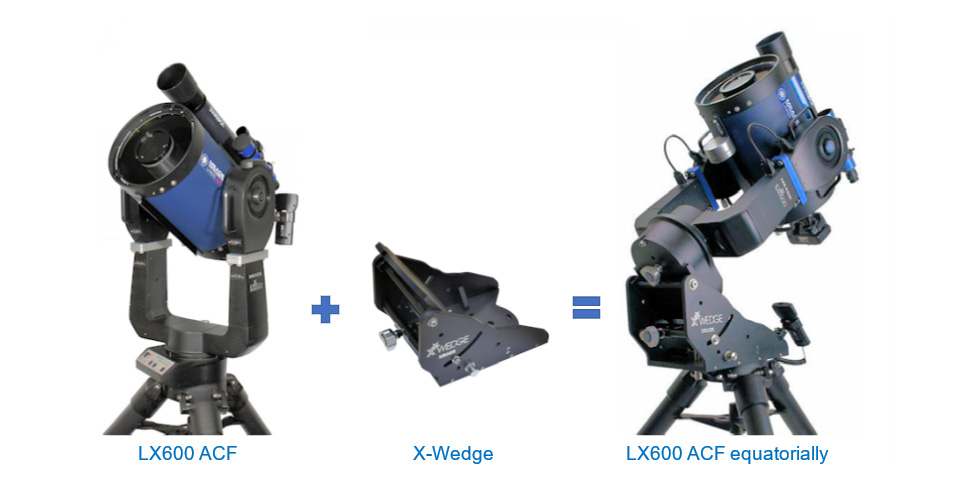
Meade LX600 fitted with the X-Wedge.
The following table outlines Meade’s current range of telescopes capable of deep sky imaging. The ETX90 and ETX125 Observer considered entry level where the LX90 ACF will require the addition of an equatorial wedge. Computerised Alt-azimuth mounts are still capable of introductory deep sky imaging but this is outside the scope of this article.
| Telescope |
Mount Type |
EQ-Wedge |
ST-4 Port |
StarLock |
Imaging Extras |
| ETX90/125 Observer |
Alt-azimuth/EQ |
built-in |
no |
n.a. |
dual visual / imaging port |
| LX90 ACF |
Alt-azimuth |
optional |
optional |
n.a. |
--- |
| LX200 ACF |
Alt-azimuth |
optional |
yes |
n.a. |
mirror lock |
| LX600 ACF |
Alt-azimuth |
optional |
yes |
included |
zero-shift dual speed focuser |
| LX85 |
Equatorial |
n.a. |
yes |
n.a. |
--- |
| LX850 |
Equatorial |
n.a. |
yes |
included |
zero-shift dual speed focuser |
| * correct at the time of writing |
Imaging requirements
This section looks at the minimum requirements for capturing deep sky images with a computerised equatorially mounted telescope.
Auto-guiding requirements
With the exception of Meade’s advanced LX600 ACF (wedge still required) and LX850 Series equatorially mounted telescopes that come with Meade’s StarLock, most other imaging setups will consist of an equatorially mounted computerised telescope with an ST-4 type auto-guide port, guide-scope, guide-camera and a PC to control and auto-guide the mount during very long exposures. Such parts would need to be acquired separately.
A guide-scope could be mounted side by side to the main imaging scope on a platform or can be mounted on top of the main imaging scope, each method has its merits. There is little to choose between the two methods but in general it is more economical to mount the guide scope on top of the imaging scope since this near eliminates flexure that may be present in inadequate platforms when the auto-guide and imaging scopes are mounted side by side. Also, modern auto-guide cameras will work reasonably well with smaller 50mm aperture guide-scopes, typically replacing the finder-scope most telescopes have.
Collimating rings can be used with a guide-scope to gain better control over it. Modern astronomy software including MaxIm DL and AstroArt among others will enable you to point the guide scope several degrees off-axis. Notable free auto-guide software includes PHD2 Guiding from Stark Labs.
Any digital camera that can support exposures of a few seconds could be used for auto-guiding. The guide camera must have an ST-4 type (auto-guide) port, this will enable the camera to communicate with the mount via its own ST-4 port.
Imaging camera requirements
Depending on the type of imaging you intend to do, certain camera types will work better than others. Cooled single shot cameras are ideal for deep sky imaging where fast sensitive video cameras are ideal for planetary, Lunar and Solar imaging (with an appropriate Solar filter for the type of telescope).
Web cameras make affordable entry level planetary type imagers but typically suffer from lossy data compression and noise. Dedicated video astronomy cameras on the other hand including Meade’s LPI-G and LPI-G Advanced cameras deliver fast framerates, very low to minimal noise and high resolutions.
DSLR cameras make excellent starter deep sky imaging cameras capable of very good results in the right hands but are still subject to noise during longer exposures, relatively low sensitivity and limited dynamic range when compared to dedicated deep sky cameras. While they are not cooled and not designed for the purpose, they are easy to use and results on the brighter deep sky objects can be very good. On the other hand, they cannot be used for photometry or with spectrometers and scientific work in general. If you already have a DSLR camera you should consider trying it out before buying a dedicated astronomy camera since DSLR cameras are easier to use and do not require a PC.
When imaging deep sky objects, extended exposures heat up the sensor and subsequently introduce high levels of noise into the image. There are a number of ways to reduce noise but the one most effective is to cool down the sensor during an exposure. Such cooled cameras use a thermocouple, heat sink and fan to typically lower the sensor temperature to typically 25-50 degrees below ambient, this dramatically reduces the noise levels in the image. The Meade DS-IV Deep Sky Imager is a good example.
Equally, colour type cameras are far from ideal for H-Alpha Solar imaging due to the nature of their colour sensors. Colour sensors will typically capture around 25% of the H-Alpha that lands on the sensor as 75% of the pixels cannot ‘see’ in H-Alpha, this also significantly affects the level of detail.
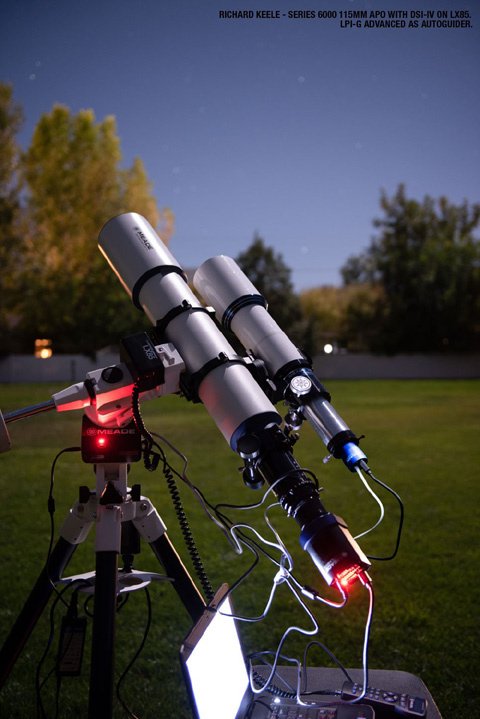
Imaging telescope with DSI-IV camera, guide scope with LPI-G Advanced camera, LX85 mount and laptop.
As such, exposure times would need to increase to compensate to a degree. However, this is undesirable as atmospheric turbulence will have an adverse effect on image quality but also a lot depends on the rest of the equipment.
Note that H-alpha is equally important when imaging deep sky objects and dedicated astronomy cameras will significantly outperform DSLR cameras due to the IR-blocking filter fitted to these cameras.
Personal computer
A personal computer is a vital part in the amateur astronomer’s equipment and can be used to control the telescope, auto-guide, edit and also store captured images. Also provide you with access to the Internet which is an excellent source of all types of information related to amateur astronomy. The vast majority of astronomy software applications will run under Windows but a number is also available for MACOS and Linux. If you do not already have a personal computer, a Windows PC may be the better way forward as it simply offers more choice.
You will benefit from a modern PC or laptop with a fast processor, USB 3.0 connectivity and at least 8GB of RAM. An SSD drive becomes more important when imaging the Sun, planets and Moon at the high speeds required for best results as you would need to capture a few hundred images in the least amount of time possible i.e., under 10 seconds depending on the equipment, target and atmospheric conditions.
Astronomy software
Software add considerable flexibility and in many cases are necessary. Software can be used to control the various hardware including telescopes, cameras, filter-wheels, digital focusers as well as for processing and storing your images.
SkySafari, Starry Night and the free Stellarium planetarium software among many others will help to visualise the night sky and even control you telescope from your personal computer, tablet or smartphone.
Image processing software for processing astronomical images include PixInSight, Maxim DL, AstroArt, Nebulosity and the freely available DeepSkyStacker and Registax among many others.
Finally, software like Photoshop and PaintShop Pro and the free Paint.NET and GIMP will enable you to further enhance the final stacked image.
Typically, free software do not have the functionality/performance of commercial alternatives but high quality images have been guided, captured and processed using free software.
What software you use depends on cost, expectations, and equipment. Starting with free software is a good strategy since they are simpler and therefore easier to understand, use and enable you to grasp the basic concepts quickly. You would then be in a better position to make a decision on commercial alternatives.
Image capture and processing: An introduction
For best results, the amateur astronomer will capture a number of image fames of the same object in succession and use these to create a single image of much higher quality using software like PixInSight, Nebulosity, the freely available DeepSkyStacker, Registax etc. Before you start you will need to accurately Polar align your equatorially mounted telescope, this is necessary for long exposures when imaging deep sky objects.
For Lunar and planetary imaging, a few hundred successive image frames need to be captured at high speed, maximum quality and at minimal exposure times. As such a fast, digital video camera capable of high frame rates, low noise and high image quality would be ideal. Such cameras can save video files or a succession of still image frames on a PC that can then be imported to say Registax for stacking and further processing.
For deep sky imaging a small number of successive frames need to be captured at exposures of a few minutes each (e.g., 5-10 frames at 3-10 minutes exposure each). The exposure duration varies and depends on the target, telescope, the mount’s ability to accurately track and the camera used.
For best results you would need to use an equatorially mounted computerised telescope, dedicated cooled astronomy camera and be able to auto-guide, accurate tracking over a couple of minutes could become problematic at long focal lengths and without the ability to auto-guide.
Assuming we wished to capture the M27 Dumbbell nebula at its simplest, you would need to:
- 1. Setup the telescope, mount and cameras as per the setting up instructions that come with these pieces of equipment.
- 2. Switch on the cameras and let the cameras stabilise for say 5 minutes period if the cameras are cooled.
- 3. Physically Polar align and then star-align the mount through the mount’s handset.
- 4. Set the camera gain to the desired value and capture a 5-minute dark frame by covering the aperture of the imaging telescope.
- 5. Remove the aperture cover and slew your telescope to locate the target i.e. M27 nebula.
- 6. Choose a star that is visible in the guide-scope’s field of view and set your mount to auto-guide on the target guide-star.
- 7. Focus the main camera/telescope on the M27, focusing the camera on a nearby star will also work and it is the preferred method.
- 8. Instruct the camera to capture 3 frames of the M27 nebula at 5 minutes each (the same exposure time and gain as for the dark frame you captured earlier).
- 9. Save the dark frame (D) as well as the three M27 images (1, 2 & 3) for further processing.
- 10. Use a software application like DeeSkyStacker to process and stack the captured images after you have subtracted the dark frame form each image captured to create a higher quality image of the M27.
- 11. Import the image in say Photoshop to enhance it.
Typically, you would use software including DeepSkyStacker, Registax, AstroArt or say MaxIm DL to stack and process the captured images and image processing software like Photoshop, Paintshop PRO or GIMP to further enhance the stacked image for best results.
However, you can do all this in an image processing application like Paintshop Pro to start with, results will not be as good but it would make the underlying concepts and process easier to understand before moving to dedicated astronomy image processing software.
Many of the operations like precisely stacking the frames would need to be done manually where specialist software would assist/automate this process.
If on the other hand you would like to use astronomy stacking software, DeepSkyStacker is probably one of the easiest to understand and will deliver good results quickly.
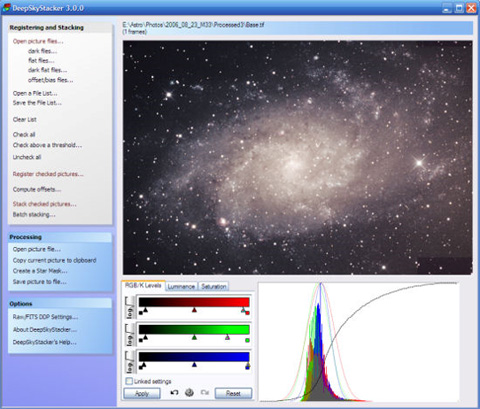
DeepSkyStacker.
DeepSkyStacker is freeware and greatly simplifies the pre-processing steps in creating quality deep sky images; the software offers support including Registering, Stacking, Darks, Flats, Derotation and simple post-stacking processing to quickly view the final result and for Saving the resulting image to a TIFF or FITS file (16 or 32 bit). Paint.NET and GIMP are also freeware and can be used to post-process the stacked image as created by DeepSkyStacker. At its most basic the process involves the following steps.
- 1. Subtract the dark frame (D) from each M27 frame (1, 2 & 3).
- 2. Align and arithmetically add the three new M27 images.
- 3. Apply a level of noise reduction to the whole image or to selected areas.
- 4. Stretch the image so that the darkest grey becomes black and the lightest grey becomes white.
- 5. Colour-balance the image.
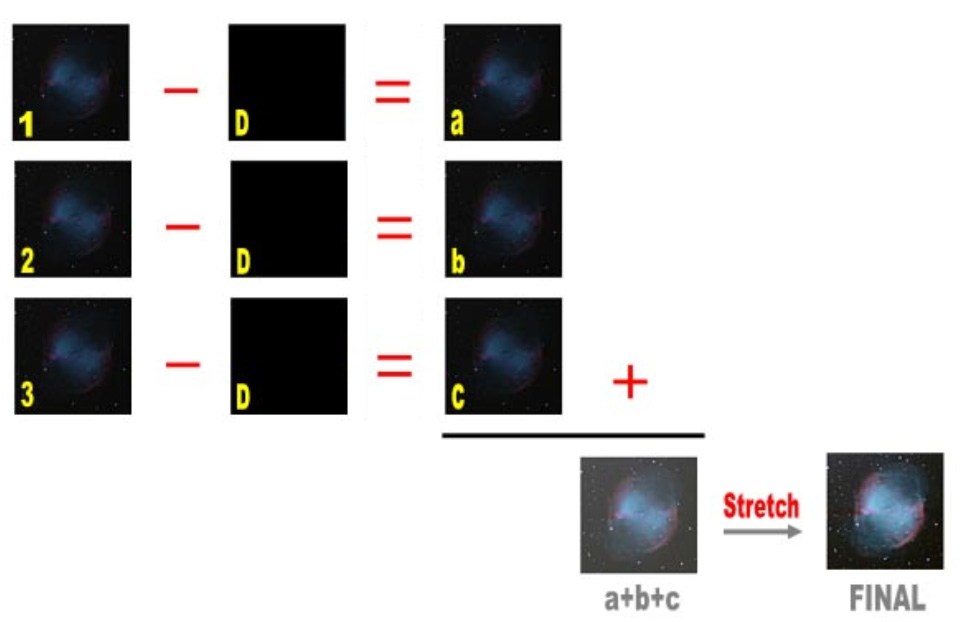
Image stacking.
If you do not have auto-guiding capability you would need to increase the number of exposures and decrease the exposure times at the same time. For example, you could capture 15 frames of the M27 at 60 seconds exposure each and a dark frame at also 60 seconds exposure. Otherwise the image processing procedure would be the same and you would simply stack 15 images instead of 3, the resultant quality would not be as good but the results would still be pleasing. You may have to do that anyway if you are using a non-cooled camera to keep noise to a manageable level.
A photo-visual nebula (UHC) filter will markedly enhance the images by excluding light wavelengths that simply introduce noise to the image where an infra-red (IR) blocking filter will reduce star-bloating during long exposures.
The process has been greatly simplified but following it will deliver satisfying results if you are a beginner in astronomical imaging. The quality of the processed images can be further improved with experience and the use of specialist astronomical software like Nebulosity, AstroArt, Registax, DeepSkyStacker etc.
Overall image quality can be increased by the introduction of bias frames and light frames into the process; however, these are beyond the scope of this article but covered and supported in DeepSkyStacker.
Imaging in monochrome
So far, this article has referred to imaging mostly with a colour camera. Monochrome imaging is popular with more experienced users or when the data collected is for use in scientific applications including spectroscopy and photometry. As such colour cameras or cameras that will not deliver a real RAW image like DSLRs are not suitable for scientific applications.
It is possible to obtain colour images using a monochrome camera with the use of colour (LRGB) filters. Instead of capturing a single full colour frame you would need to capture four such frames of the same target using transparent, Red, Green and Blue (LRGB) filters. The L (luminosity) filter could be used to focus the camera and could also be used to increase the brightness of the final image. Monochrome cameras are markedly more sensitive than their colour equivalent, typically 2.5 – 3 times more sensitive, and will also register markedly more detail resulting to superior final images.
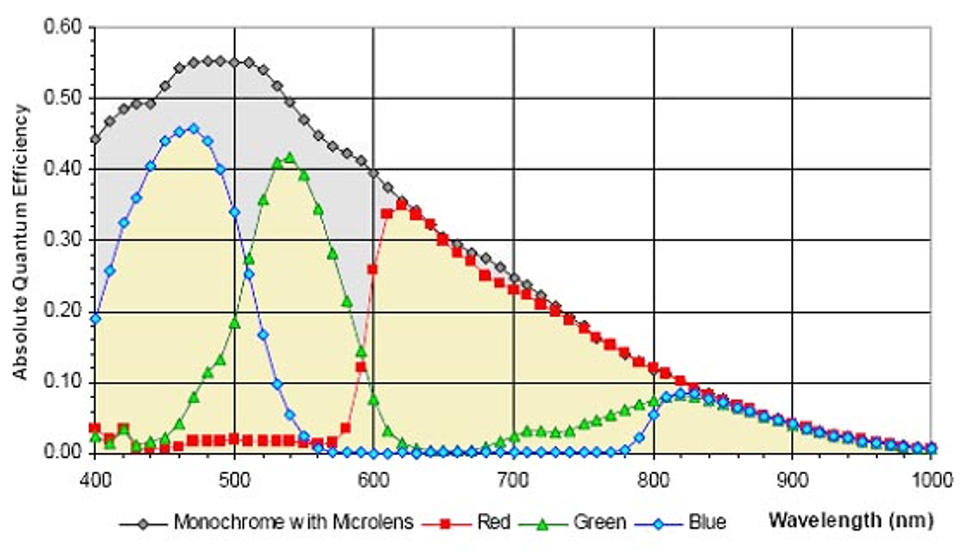
Quantum efficiency (QE).
The above diagram shows the Quantum Efficiency (QE) of the monochrome Kodak 4020ME sensor and the respective RGB QEs of the colour 4020ME sensor (yellow areas). It should be obvious from the above diagram that when imaging with a colour camera, certain wavelengths will be registered twice as the Red, Green and Blue graphs overlap. This is one of the reasons colour sensors cannot be used in scientific applications, colour pixel interpolation is another.
The LRGB data can be later combined to create a single colour image frame. Still using RGB filters with a monochrome camera is preferred to one-shot colour imaging as it delivers superior results making the extra effort worthwhile for more demanding/experienced users. Typically, all astronomy and image processing software like say PixInSight, AstroArt and Photoshop will allow you to create a colour image by combining three L, R, G, B images. The concept at its simplest form is illustrated in the following diagram.
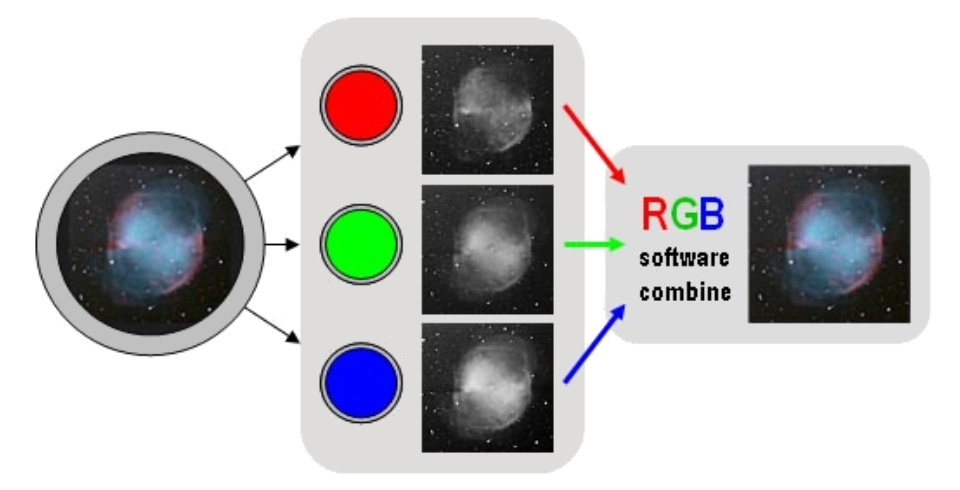
Combining LRGB (luminosity, red, green, blue) image data to create a single colour frame.
Finally, monochrome cameras are very well suited for narrow band imaging, typically done with three line filters i.e., H-alpha, OIII and SII. These filters help to create high contrast deep sky images of various deep sky
objects but mainly emission and diffuse nebulae including the Veil Nebula, Orion Nebula, North America Nebula and Horsehead Nebula. Also, planetary nebulae including Dumbbell and Ring Nebula.
Optical designs
This section outlines the most popular types of telescopes in terms of their optical design that you should be aware of before making a decision on the type of optical tube you may need. There are mainly three types of OTA (optical tube assembly) namely, Newtonian reflectors, refractors and catadioptrics that include Maksutov-Cassegrain, Schmidt-Cassegrain (SCT) and ACF. What type of optical tube you choose depends on whether you were more interested in planetary or deep sky imaging. And if you were interested in deep sky imaging would that be wide field instrument or otherwise.
Newtonian reflectors
Fast Newtonian reflectors at focal lengths F/4 to F/5 make good entry-level deep sky imaging telescopes at a reasonable cost but suffer from coma. They need care since their optics are exposed, require regular collimation and heavy-duty mounts for 10-inch instruments and above. Still, they are an excellent entry point to deep sky imaging and offer excellent value.
Apochromatic refractors
High quality apochromatic (APO) refractors using ED glass are ideal for planetary observation and for deep sky imaging in particular. Low focal ratio F/5-F/7 and short focal length APO refactors at apertures between 70mm to 115mm will capture high resolution crisp images making them ideal for wide field imaging. They are easy to handle due to their small size and light weight making them very portable when paired with a capable medium capacity mount like the Meade LX85. Smaller refactors require longer exposures due to their generally reduced apertures. Otherwise, refactors become difficult to manage at apertures above 6 inches in aperture due to significant increases in size in terms of physical length and also weight.
Maksutov-Cassegrain
Maksutov-Cassegrain telescopes are better suited to planetary/Lunar imaging and for imaging deep sky objects of smaller apparent sizes as dictated by their longer focal ratios i.e., typically F/12 to F/15. They become particularly unwieldy at apertures above 8 inches due to significant increases in size and particularly weight.
Schmidt-Cassegrain (SCT)
Schmidt-Cassegrain (SCT) are good all-rounder telescopes. SCT telescopes have been very popular and a large array of accessories is available for them, they typically come in F/10 focal lengths making them suited for planetary, Lunar and for the imaging deep sky objects of small to medium apparent size. Like Newtonians, they suffer from coma readily visible as you start moving away from the centre of the field of view. Meade no longer manufactures SCT telescopes. These have been superseded by the superior Meade ACF.
Meade ACF
Meade have abandoned the old Schmidt-Cassegrain (SCT) design for the introduction of Advanced Coma Free (ACF) optics. The ACF design offers exceptional optical performance across the whole field of view unlike SCT.
Using this Meade exclusive design, making ACF optics equal to Ritchey-Chrétien systems, ACF achieve aplanatic performance - with a flatter field, reduced astigmatism and no diffractions spikes found in Ritchey-Chrétien and Newtonian telescopes.
All Meade ACF optical tubes use the same advanced Meade optics but the range of accessories, finish, aperture, focal ratios mechanical features may vary. They come in F/10 and F/8 focal ratios.
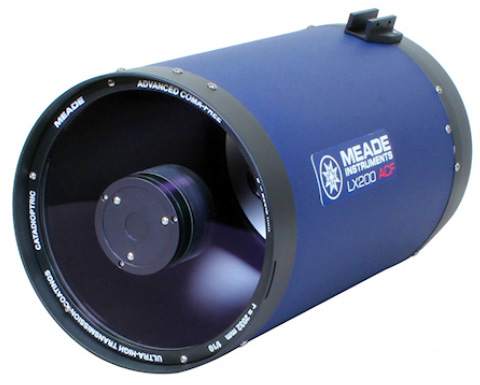
Meade ACF (advanced coma free) optics.
Summary
No single telescope will do everything. Long focal lengths, non-obstructed optical designs favour planetary/Lunar imaging and as such apochromatic (APO) refractors would theoretically be ideal for planetary/Lunar imaging. However, the lack of an obstruction does not compensate for their relatively small apertures and high cost when compared to say ACF telescopes twice the aperture. For example, an 8-inch ACF will capture around 4x the light a 4-inch refractor would capture assuming equal focal ratios. Typically, the best planetary images are produced by catadioptric telescopes of around 10-14 inches in aperture.
If wide field imaging is important, a fast-focal ratio 70mm-115mm apochromatic (APO) refractor or an F/5 Newtonian reflector would be ideal while being aware of their advantages and drawbacks when compared to each other.
Maksutov-Cassegrain telescopes would be ideal for planetary/Lunar and for imaging deep sky objects of smaller apparent sizes. However, they become unwieldy at 8-inch apertures and above.
Finally, ACF optical tubes come in F/10 and F/8 focal ratios making them general-purpose while offering high quality corrected optics without the need for internal correctors. They achieve this with a minimal number of optical elements and surfaces unlike alternative designs that use over twice as many that are subject to misalignment, light loss and the introduction of various types of aberrations since light has to go though glass lenses.
Meade telescopes for imaging
This section presents a range of Meade telescopes that come equatorially mounted or can be equatorially mounted and therefore appropriate for deep sky imaging and imaging in general.
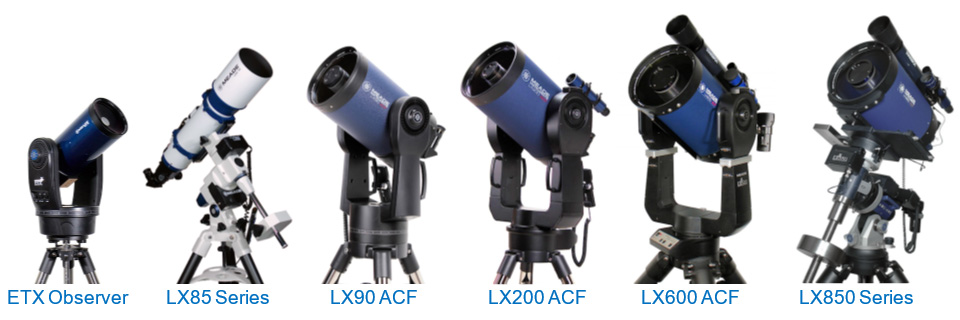
Meade telescopes suitable for imaging.
ETX90 and ETX125 Observer
The ETX125 Observer and ETX90 Observer use Meade’s premium Maksutov-Cassegrain optics for pinpoint star images and excellent contrast. Both these scopes are ideal for detailed Lunar and planetary work. The markedly larger aperture ETX125 is a reasonably good deep-sky performer and can be used for deep sky imaging to capture images of the brighter deep sky objects, Moon and planets.
Both scopes include a stable but portable full-size steel tripod with dual-fork mount and equatorial (EQ) tilt plate - allowing for polar alignment placing the scopes in equatorial mode, which is ideal for astro-photography. They both have an internal flip mirror to let light focus to the rear of the telescope (instead of the mirror reflecting the light 90-degrees to the eyepiece), allowing attachment of a camera on the back of the scope; adapters are available separately.
They come with Meade’s latest AudioStar handset and can be connected to a PC, iOS or Android tablet; the required WiFi adapter and cables are available separately.
LX90 ACF
The GPS enabled LX90 ACF offer a sophisticated level of performance, quality, features, Meade’s ACF optics and the ability to upgrade the telescope as the need arises. The LX90 ACF is an ideal high-resolution visual observing instrument but is also fully qualified for the more advanced areas of astronomy, including long exposure astrophotography with the addition of an optional wedge and ST-4 port, both available separately.
Like all Meade ACF telescopes, the LX90 ACF features Ultra-High Transmission Coatings (UHTC). UHTC are specialised multi-layered coatings that are precisely designed to improve the performance of the telescope’s optics. You’ll see brighter star clusters, more fine detail in nebulae, and additional surface features on planets. Averaged over the entire visible spectrum, total light transmission to the focal plane increases by 15%.
The LX90 ACF comes in 8-inch, 10-inch and 12-inch apertures and includes Meade’s latest AudioStar handset with over 30,000 objects database, speech and an array of other features. The LX90 ACF can be connected to a PC, iOS or Android tablet; the required WiFi adapter and cables are sold separately.
LX200 ACF
The LX200 ACF builds on the LX90 ACF to offer a heavy-duty mount, GPS, enhanced connectivity, UHTC optical coatings, a built-in ST-4 auto-guide port and mirror-lock making this telescope ideal for astrophotography with the addition of an optional wedge to equatorially mount the telescope.
The LX200 ACF comes in F/10 8-inch, 10-inch, 12-inch, 14-inch and 16-inch apertures. It features the AutoStar II computer system with 145,000 object-library, multiple guided tours, High Precision Pointing capability with sub arc-minute pointing accuracy, and Meade’s SmartDrive with Permanent Periodic Error Correction. It can be connected to a PC, iOS or Android tablet; the required WiFi adapter and cables are sold separately.
LX600 ACF
Built round a heavy-duty fork-mount this fast F/8 Advanced Coma Free UHTC optical system produces a wider, flatter field with no coma for pinpoint stars out to the edge of larger imaging sensors and extreme wide-angle eyepieces. Comes in 10-inch, 12-inch, 14-inch and 16-inch apertures.
The LX600 ACF incorporates GPS, StarLock for full time guiding at one arc second precision, mirror lock, zero shift dual speed focuser, AutoStar II GOTO system with over 145,000 object library, and more.
The LX600 F/8 ACF with StarLock technology takes a giant leap forward by making astro-imaging and setup easier. The collection of features and technology integrated into the LX600 is unavailable from any other manufacturer and its ease of use cannot be duplicated by just attaching a set of add-ons to another scope.
A wedge is sold separately and is required for serious deep sky imaging. The LX600 ACF can be connected to a PC, iOS or Android tablet; the required WiFi adapter and cables are sold separately.
LX85 Series
The LX85 Series telescopes feature a modern, high-quality, portable, GoTo, 15Kg capacity German equatorial mount with the latest AudioStar computerised handset. The LX85 Series would be the perfect choice for the experienced observer and astro-imager looking to observe and image the Moon, planets and specifically deep sky objects out of the box (camera and power source required). The LX85 will enable you to seamlessly image the best parts of the night sky with not having to worry about performing a meridian flip. The mount uses servo motors on both axes, has an ST-4 auto-guide port, Permanent Periodic Correction (PPEC) and is compatible with the Meade Zero Image Shift Electronic Micro Focuser.
The LX85 Series telescopes come with a wide variety of optical tubes from 70mm to 8-inch apertures including a 70mm quadruplet astrograph, 80mm and 115 APO triplet refractors, 5-inch achromatic refractor, 6-inch and 8-inch ACF, 6-inch Gregorian Maksutov and, 6-inch and 8-inch Newtonian reflectors.
LX850 Series
The LX850 Series telescopes draw on over 40 years of experience and innovation to create the ultimate imaging platform designed to deliver the new standard in astro-photographic and visual performance. The telescope comes complete and can be used ‘out-of-the-box’ to image with. All you need is an imaging camera.
Includes StarLock dual imager integrated full time guider, Ultra Precision Pointing and Assisted Drift Alignment, 5.8" (14.7 cm) 225 tooth polished bronze worm/gear drives , internal cable routing, GPS receiver, Permanent Periodic Error Correction (PPEC) AutoStar II GOTO system with over 145,000 object library, heavy-duty adjustable height tripod with anti-vibration pads, Universal AC Adapter, Meade Zero Image Shift Electronic Micro-Focuser, telescope to computer USB cable and AutoStar Suite software.
The LX850 Series come with a choice of a 10-inch, 12-inch or 14-inch ACF F/8 optical tube or a Series 6000 130mm APO refractor.
Imaging accessories
This section presents lists Meade’s planetary, deep sky and auto-guide cameras. As well as auto-guiding solutions.
Cameras
Meade supplies a number of cameras including the LPI-G video cameras and cooled DSI-IV single shot deep sky cameras. These come in colour and monochrome versions, monochrome versions of the same model being 2.5-3 times more sensitive than the same colour model.
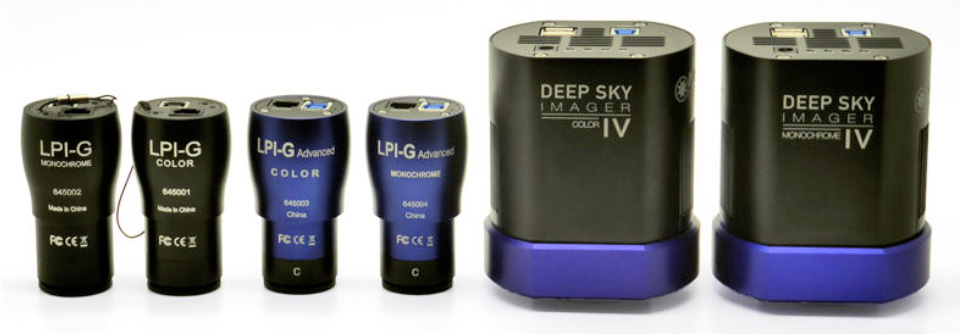
Meade astronomy cameras.
Dedicated video and single shot astronomy cameras can be attached to any telescope mentioned in this article as can a DSLR camera.
A video camera like the LPI-G Series can used to observe in real time and also capture images of the Moon and planets where a single shot camera like the DSI-IV capable of extended exposures will be able to capture deep objects in full colour or in monochrome.
When used as an auto-guider, a monochrome LPI-G video camera will be able to auto-guide on fainter stars. Equally, a monochrome camera will pick up significantly more detail when imaging deep sky objects or the Sun with a dedicated Solar scope like the Coronado PST or SolarMax when compared to the colour equivalent.
Colour filters can be used to compose colour images with a monochrome camera or false colour images like those of the Hubble space telescope with narrow band filters.
Please note that if you do not use a dedicated Coronado Solar scope, Solar filers used with astronomical telescopes should typically cover the whole aperture to protect both the optics of your telescope and the observer’s eyes. Never point your telescope towards the Sun without adequate protection. If you are not certain please contact us for advice as this a complex subject.
ST-4 Auto-guiding
The LX600 ACF and LX850 Series come with StarLock that supports advanced auto-guiding and therefore both scopes are beyond the scope of this section. Note that to auto-guide, the telescope must be first equatorially mounted unlike the LX85 and LX850 Series that come on German equatorial mounts as standard.
With the exception of the LX600 ACF and LX850 Series that come with StarLock and the ETX125 Observer that does not have an ST-4 type auto-guide port, computerised equatorially mounted telescopes will greatly benefit from auto-guiding since this will extend exposure times beyond the capabilities of a deep sky camera opening a huge horizon of possibilities.
| Telescope |
Mount Type |
Wedge |
ST-4 Port |
StarLock |
Meade Zero-Shifting Focuser |
| ETX90/125 Observer |
Alt-azimuth/EQ |
built-in |
no |
no |
not supported |
| LX90 ACF |
Alt-azimuth |
optional |
optional |
no |
not supported |
| LX200 ACF |
Alt-azimuth |
optional |
yes |
no |
optional |
| LX600 ACF |
Alt-azimuth |
optional |
yes |
included |
optional |
| LX85 Series |
Equatorial |
n.a. |
yes |
no |
optional |
| LX850 Series |
Equatorial |
n.a. |
yes |
included |
included* |
| * correct at the time of writing |
All telescopes mentioned in this article are capable of automatically locating and accurately tracking Celestial objects, offering the ability to capture images using a standard digital or dedicated astronomy camera to various degrees.
Equatorially mounted telescopes, on a wedge or otherwise, must have an ST-4 type auto-guide port to be able to auto-guide and to extended exposures typically beyond the capabilities of today’s astronomy cameras, also eliminating field rotation while in equatorial mode.
A guide-scope and auto auto-guider camera will be required e.g., Meade Series 6000 50mm Guide Scope and Meade LPI-G camera.
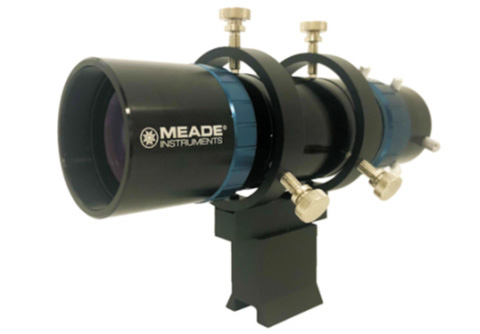
Series 6000 Guide Scope.
Where the LX85 Series come with an ST-4 auto-guide port as standard, the LX90 ACF Series will support auto-guiding with the addition of a separately available wedge and Meade Auto-guide port module seen on the right.
Otherwise, Meade’s advanced telescopes including the LX200 ACF, LX600 ACF and LX850 Series come with an ST-4 type auto-guide port as standard.
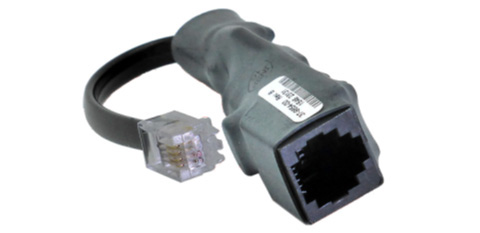
Series 6000 Guide Scope.
StarLock
The LX600 ACF and LX850 Series come complete with Meade’s state-of-the-art auto-guiding system, StarLock. The StarLock unit incorporates a large 80mm telescope two on-board cameras and electronics to enable it to precisely auto-guide the mount without the need of a PC. StarLock offers one arc second guiding precision and certain LightSwitch features to enhance auto-guiding further.
The collection of features and technology integrated into the LX600 ACF and LX850 Series is unavailable from any other manufacturer and its ease of use cannot be duplicated by just attaching a set of add-ons to another scope.
StarLock is only compatible with the LX600 ACF Series and LX850 Series, and is also bundled with the LX850 German equatorial mount if purchased separately.
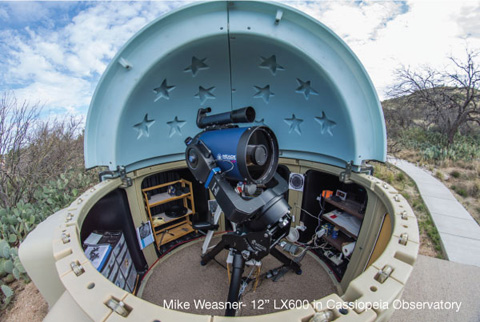
Meade LX600 telescope fitted with X-Wedge.
Using an ST-4 type auto-guider solution with the LX600 ACF and LX850 Series telescope would simply downgrade their built-in auto-guide capability.
Note that the LX600 ACF would still need to be equatorially mounted with the addition of a wedge for extended exposures.
Remote control for Meade telescopes
Meade computerised telescopes can be controlled via their bundled handsets, from a PC or iOS/Android tablet with the appropriate software, adapters and cables.
Stella WiFi connectivity
When the Meade Stella WiFi is paired with the SkySafari app, it will enable you to wirelessly control your computerized telescope with your smart phone or tablet. the Stella Adapter communicates and aids in controlling your telescope visualising the night sky on the screen as you would do on a digital planetarium. You would need the Stella WiFi adapter, Sky Safari 6 Plus/PRO and a Meade #505 or #507 cable depending on the telescope you wish to control. Please refer to the diagram below.
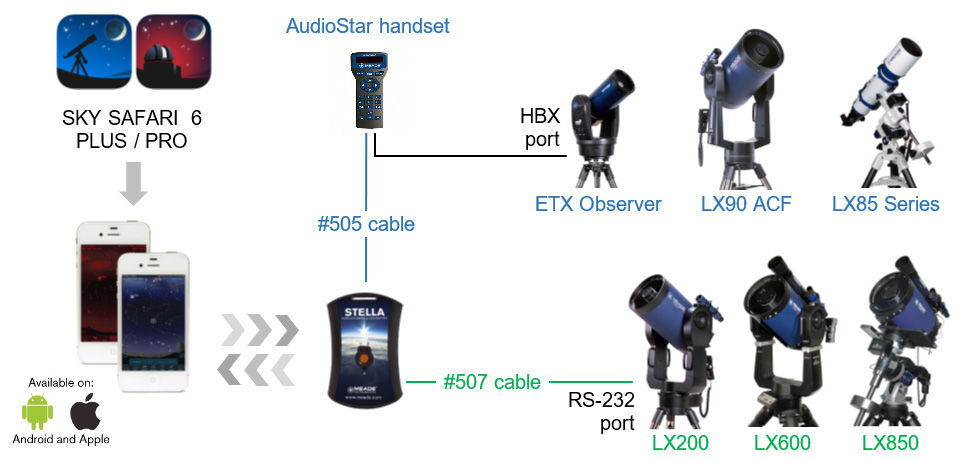
Stella WiFi adapter connectivity.
Computer connectivity
The telescope can also be controller remotely from a computer or laptop running Microsoft Windows.
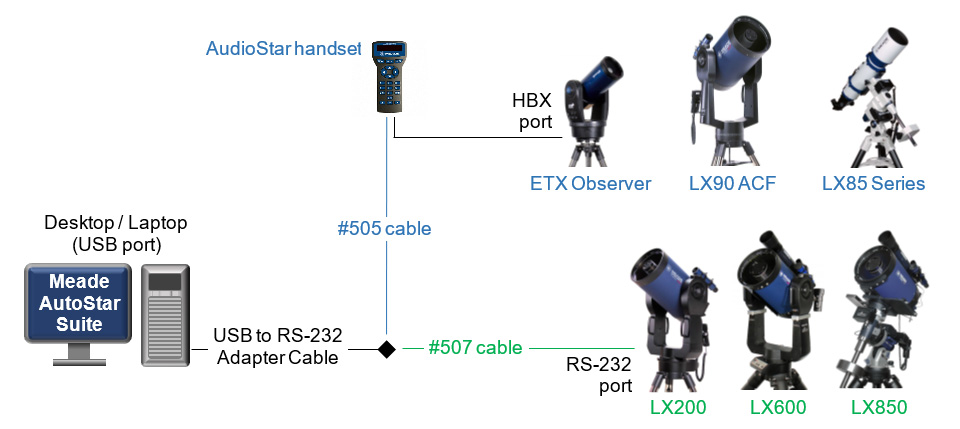
Computer connectivity with Meade #505 or #507 cables and the USB to Serial adapter cable.
The Meade #505 or #507 cable in conjunction with the Meade #07507 USB to RS-232 Serial Adapter cable are required to connect and remotely control most Meade computerised telescopes with a #495 or #497 AutoStar, AudioStar or AutoStar II handset from a PC. Please refer to the above diagram. In addition, you can use the Meade AutoStar Suite software, available as a free download at www.Meade.com, to update the telescope’s firmware to the latest version using this setup.
USB to RS232 (Serial) adapter cable
The Meade #07507 USB to RS-232 Serial Adapter cable permits connection of any Meade telescope's RS-232 serial interface to a PC or laptop’s available USB Port. This allows you to use the Meade #505 Cable or #507 cable to connect your telescope to a PC with a USB port.
Software
The free to download Meade AutoStar Suite form www.meade.com, permits the update of the telescope’s firmware, the loading of events such as comets, satellites, and minor planets, and allows you to share or "clone" this information with other AutoStar and AudioStar handsets.
You can also control your Meade telescope via third party digital planetarium software similar to Sky Safari, Stellarium etc. For advice and information on third party products and their features please contact the software authors for suitability and compatibility.
Related topics:
how-to guide, astrophotography, article


